NOTE: Below are the instructions for a Hard Reset - This is required if you are locked out of your tablet or your touch screen in unresponsive. If you can access the Settings Menu on your tablet, you can also do the >> Factory Reset via the Settings Menu. Click the previous link for instructions, which are a bit easier than the Hard Reset explained below.
- Power off the tablet by holding the Power button until a tiny menu pops up
- Tap "Power off" on the pop-up menu
- [IF your device is unable to power off by holding the Power button, follow these steps to switch off your tablet] Remove the android tablet from your CollecTin More > How to remove your android tablet from your CollecTin More video
- Using a slim paperclip or single stable, press the small button inside the pin-sized hole underneath the power button on the side of the tablet, which will turn the screen and tablet off
- [IF device is already off start here] Press and hold the Power and Volume down keys at the same time for about 10 seconds or until the CollecTin logo appears
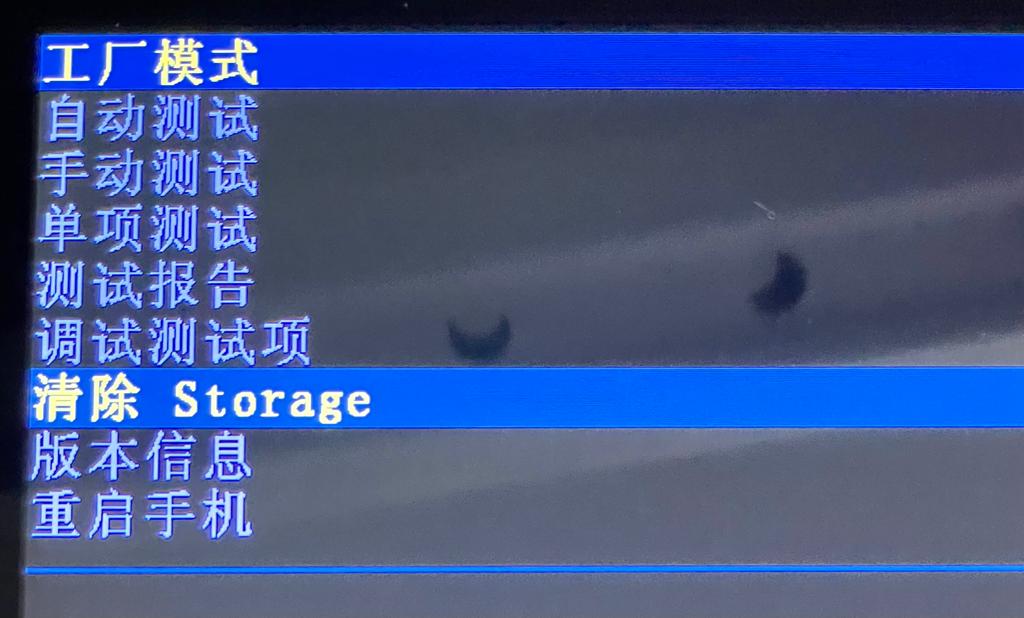
- The tablet should enter factory mode, first yellow Chinese characters appear, which is followed by a menu
- Use the Volume Down key to highlight the option with 'Storage' as shown in the picture below:
- Press the Power button to select the option and commence factory reset
- Wait until the reset is complete
- The tablet should restart
Next, please continue with the Quickstart Steps for your device (model number on sticker on back), from 1. to 3. AND 6 (also included below).
Quickstart Guide Last step after reset:
6. Set the Fully Single App Kiosk Schedules Wake up and Sleep Times
- Swipe up from the bottom of the screen and tap on the circle icon in the bottom middle to return to the home screen
- From there, swipe up anywhere on the screen to access the apps drawer
- Tap on the “Fully Single App Kiosk” app icon (blue ‘f’)
[IF the app ask for permissions] :
Tap 'OK’
Tap on the ‘Fully Single App Kiosk’
Tap the switch button to the right of ‘Allow from this source’ (the switch on the right should turn blue)
Tap the triangle icon at the bottom left of the screen or the arrow at the top left until you are back to Fully’s main screen
- You can type a custom PIN in the ‘Kiosk Exit PIN’ field; write the new PIN down (we cannot help if you forget/lose it!) or leave the default one in (“1111”)
- Adjust the ‘Wake up and Sleep’ functions
- Swipe in from the left side of the screen to open the Fully menu
- Select ‘Settings’, then ‘Power Settings’
- Tap on ‘Schedule Wakeup and Sleep (PLUS) > Edit the default times to suit your preferences or tap on the rubbish bin icon to disable the function altogether; you can also add multiple wakeup and sleep times by tapping on the blue ‘ADD ANOTHER TIME’ button from the bottom left of the screen. Note: "Wake up" time is first, and "Sleep" time second.
- Tap the triangle at the bottom left of the screen until you are back to the Fully Single App Kiosk Quick Settings screen and carry on with the rest of the steps
Tap ‘START KIOSK MODE’
Make sure the Test Mode toggle is off (grey) and select ‘YES’ on the confirmation pop-up
From the ‘Select a Home app’ menu, tap on ‘Fully Single App Kiosk’ (NOT Quickstep)
On the “Hmmm… One more try!” pop-up tap ‘RETRY’
Tap ‘Always’ on the “Use Fully Single App Kiosk as Home”
Your will now be taken to the Give A Little app
Lastly, to make sure the settings are not accessible while in Kiosk mode:
Swipe up from the bottom of the screen and tap on the square to bring up the list of open apps
Swipe to the right until the ‘CLEAR ALL’ option appears in the middle left of the screen, after all the apps
Tap on ‘CLEAR ALL’ and wait for Give A Little to restart
Was this article helpful?
That’s Great!
Thank you for your feedback
Sorry! We couldn't be helpful
Thank you for your feedback
Feedback sent
We appreciate your effort and will try to fix the article